
I didn't want to become someone who ONLY sees money as incentive to create art. Neither did I want to put my life on hold to make it all about my art either. When I look back at these past few weeks - how hectic they've been, with very little room for making art, I recognise that I have a pretty amazing life! The art is the bonus when I can fit it in, but I have some wonderful people to share my life with in the meantime.
I can see my creative life and family, marrying nicely, without there needing to be a downside.
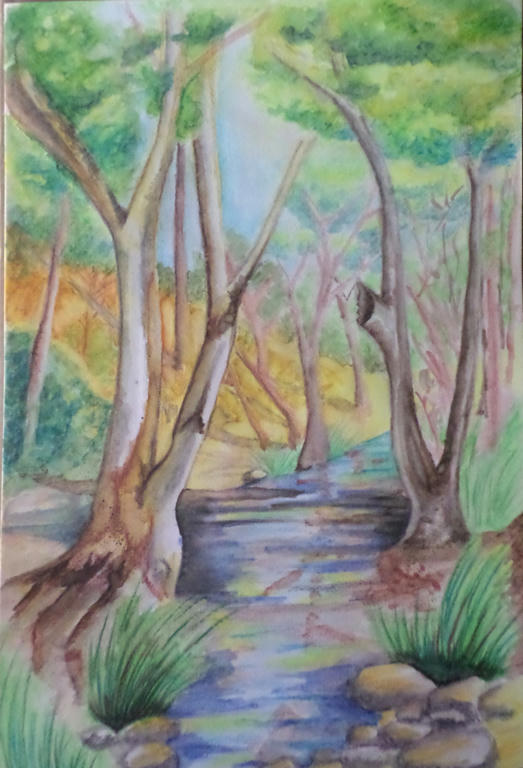
I have managed to squeeze in some time to complete my watercolour picture though. It was a very patient process, which in hindsight I enjoyed. I got some feedback from my mum when she came to visit, to spread the blue around the rest of the scenery - which I did in the tree leaves, about the middle canopy of the front two trees. Making it slightly darker added depth, but also linked the blue up with the water.
My mum even suggested I break the banks (so to speak) and let the water spill behind the tree, to break the bottleneck happening in the middle. I was surprised how these little changes made a significant difference. While I couldn't lift the heavy blue from the water, I could spread it around the scenery to soften the water's intensity.
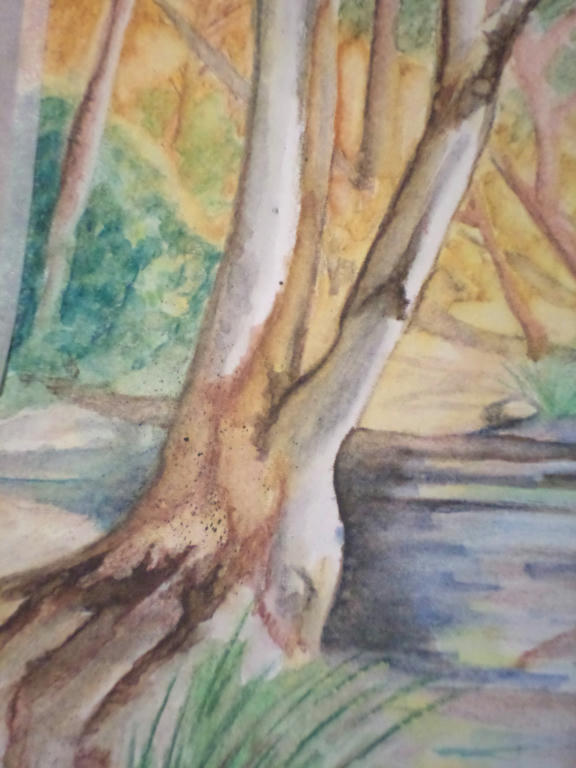
Thanks to Linda's youtube suggestion, I even learned some new techniques for improving the bark on the trees. The "vein" technique the artist used in the video to make flower petals and leaves, I used to make the bark. I was very pleased with the results. I even did some more splattering.
While I don't believe I saved this picture completely, I'm happy that I saved it from the bin! I learned a lot from experimenting with how the water reacted to the colour, even with pencils.
I still have a lot to learn with this medium, but the greatest lesson I'm taking away from this exercise, is not to give up. Plodding along is what I do best anyway. Thanks to others who also shared their feedback here, and it was Linda especially who kept me at this picture. I was going to give up on it, but you said not to - so I found a way to make it work a little better. So thank you Linda.
I just love this! Do you remember me telling you about how one of my teachers told me to that every painting gets "ugly"? Not that yours ever did-just that we all tend to want to give up way too soon when each work has great potential.
ReplyDeleteYour moms advise did wonders to bring the water to life didn't it? And deepening the colors on the overall picture makes the lights of the water sing.
I am glad you listened to me and persisted Chris. Maybe not everything we do is really full of potential but we owe it to ourselves to take a step or two more into a work before scrapping it. At least then we learn something. Its been a pleasure to see this unfold.
Now its a pleasure for me too, but before it was ARGH, WHAT AM I DOING??? Lol.
DeleteI recall that about your teacher, and when I looked back at the different stages, I think some were ugly - but you're right to attempt pushing past that and see what else emerges. That video you linked to, really helped me see how important the water aspect was. I've only ever used the watercolour pencils, as pencils, but now I can see the potential with more variations on water techniques. :)
And about what kind of artist you want to be. Let it unfold. You are just redisovering your gifts and doing so in relative chaos to boot. When you are settled down one day soon, you can think about being a commercially motivated artist. Right now you are finding your voice. That is such a huge step.
ReplyDeleteVery true. Testing the voice is what its all about right now. :)
DeleteThat's lovely, now Chris. The water is so much better and I like the blue in the treetops, too.
ReplyDeleteJust a question here, since I've not tried it (not tried anything yet!), but if you've made a particular colour too dark, (like the original water), can you put a thin white wash over the top or wouldn't that work.
Thanks for coming along with me on this too, foodnstuff. I didn't actually try the white pencil on my picture but did a separate experiment instead. I was curious because I had read others didn't think much of the white pencil being effective with changing colour.
ReplyDeleteIn my experiment, I did several swatches of the same intense blue, then after adding a water wash, I let them dry. I tried lifting the colour with water and a paint brush first, then I tried on a separate swatch, adding the white pencil on top and washing with water again. Of the two, lifting the colour with simple water was more effective than adding the white, even if the white made a slightly paler blue to the original. On my last swatch I tried lifting the colour with water first, then after it dried, adding the white pencil and final wash on top.
Remarkably, just lifting the original colour with water and a brush, was the most effective technique to lighten. Adding the white on top didn't make any difference at all. I couldn't get it any lighter. So its just as I've read elsewhere - white watercolour pencils don't really make a notable difference. I'm sure they have their place though, I just haven't found it yet. ;)
You can use the white pencil as you suggested, by the way, just in case it sounded like there was something wrong with that technique. I just found a better result by lifting the original colour with a wash of water, and lifting it back off with a clean brush. :)
Thanks for the comprehensive reply, Chris. I'm learning from you, even though I'm not learning by doing it myself (time, time...why aren't there more hours in the day?
ReplyDeleteMy water brush set arrived yesterday, so now I have the paper, the pencils and the brushes. No excuses to not try something now!
To save me replying to your next post, I love the mushroom! I've been casting around for something to draw; maybe that's it. I have a mushroom ID book full of pictures, I could use that. Did you draw yours from a photo or the real thing? I've only ever drawn from photos before...the real thing would be very hard, I think, but I need to be able to do it.
I've searched out some pencil drawings I did many years ago and have scanned them into the computer. I'd like to show you them somehow...have been thinking about how to do it (apart from sending them as an email attachment (some have turned out large in memory terms). I was thinking about adding another page to the blog and displaying them there. I've done a draft post to the main blog with the pictures in it and it looks OK in preview mode.
With all those new supplies, you sound set to go now! Time is always a quandary. I slip my creative time in small windows, here and there. Its great to have something to look forward to returning to, if its not done yet. I chip away at a picture like I would planting up a garden - piece by piece.
DeleteAnd I'd love to see a new page on your blog showing your previous work. That would be awesome! I reckon all your regular readers would love to see them too. If you wanted to email me any questions, pop me a line at cdriley at bigpond dot com (minus the spaces and stuff).
I got the image from the mushroom from a free photo resource site. It may be difficult to see on the original post, but if you click the word "here" it will link you to the website. You'll have to go fishing for the mushroom though. You can do searches in the search bar, at the top-right of the page. But if you have a book with pictures, that will serve you equally as well. Its all about the practice, so (like me) take your inspiration wherever you can find it! ;)
OK, with much temerity, I've done it! I've added a new page to the blog called Artwork. You can access it under 'pages' at the top right. Now I've got to keep it going!!
DeleteGoodie! I'll take a look now. :)
DeleteIf I may Chris, is your white China White? If so, beware that it dulls out underlying color. I have not tried to "mix" with China white but I have overlaid over mistakes and it was just one more mistake. There is a man on youtube who using Zinc White to good affect and I have read here and there that Zinc White is preferred. HOWEVER, I don't think that these are meant to fix mistakes so much as to use when you don't want the white to be the paper because you want more texture or a different value of white. The best way to figure it all out is to take a scrap paper and mix your colors with the added white. Overlay the white over too dark of a color, play around and see if that is the effect you want. Take notes throughout, I.e. percentage of white to red or what have you. Color theory excercises with added white in other words. My two cents. Hopefully it helps.
ReplyDelete